Help 
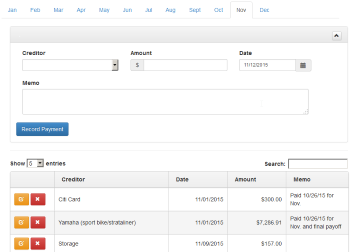
Payment Log

In some cases this may be a new creditor. If you have introduced the creditor say, in March, payments before that would not apply. You will see the red tag in these cases. The application upgrade plan includes details for incorporating that feature. The payment log also shows you your available funds based on the payments you have already made.
Some additional features in the payment log include the ability to specify the number of records to show on each page. If you have more creditors that the minimum number or records you will be presented with paging buttons at the bottom. You will also notice that there is a search box that allows you to search for a particular set of creditors based on your query. The more detail you add to your query the more precise the results will be. Lastly, by clicking on the column header you are able to sort the list of records based on what you clicked.
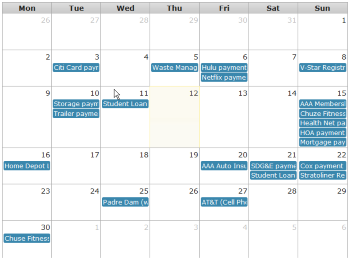
Calendar
Payments
You will also notice that the screen contains tabs representing each month. This allows you to select a month to views its payments. You also have the ability to make a payment for the future or for the past. Simply change the month and/or year that you want to make the payment for and record the payment. This allows you to populate the application with all of your payment records.
If you are late making a payment then the late fee as it is configured on the creditor screen for the creditor in question will be applied to the minimum payment amount so that you know exactly how much you owe that creditor.
Income
- At the top of the Payment Log screen you will see the Available Funds label which is the amount of in income minus payments you've made to bills.
- In the reports you will see a tab for Data Points, there you will see information about how much you'll need to earn a year to be able to make your payments every month.
To enter your check each time you get paid just simply complete the form fields and click Record Income.
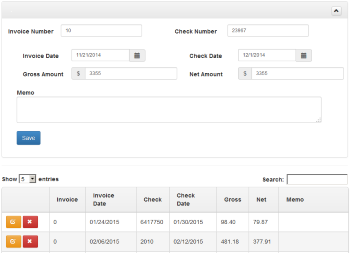
- Invoice Number - If you are a contractor or business you can enter the Invoice number but if you are an employee for a company you can just enter a 0 in this field.
- Check Number - The check number should be printed on the check you receive no matter if it is a personal check or a business check.
- Invoice Date - Enter the date that you submitted your invoice or if you are an employee simply enter the date the pay period ended.
- Check Date - Enter the date that you received your paycheck.
- Gross Amount - This is the amount you earned before taxes. This should also be present on your check. If it is a personal check it would be the entire dollar amount.
- Net Amount - This is the amount that you take home after taxes. If this is a business check the amount should be printed. If this is not then it is your responsibility to determine what your net amount should be.
- Memo - Feel free to enter a memo or note regarding the details of your paycheck. You're free to enter anything you like.
Once you are finished completing the form click the Record Income button. You should see a new row created in the table indicating that it was sucessful.
Creditors
Creditor Attributes
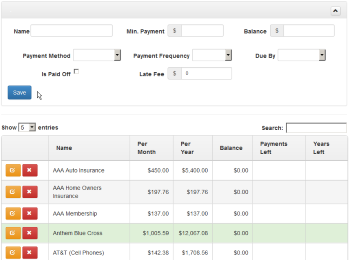
- Name: The name of the creditor that you make payments to. This could be a Utility or it could be Rent or Mortgage, what ever your situation requires.
- Min. Payment: This would be the payment amount you typically make each time you pay this creditor. This is also auto-filled when you are recording a payment on the payments screen.
- Balance: This really only applies to revolving credit where there is a pay-off date and an account balance. If this is a Utility then you should set this value to 0.
- Payment Method: This is the method that you use to make the payment to the creditor. For example, you may make a payment in cash for something and it may or may not be recurring.
- Payment Frequency: This is how often you make payments to each creditor. This field is also used to filter certain features like the missed payments alert when you are looking at the payment log. That will only check against payments that are made on a monthly basis.
- Due By: This is the day of the month that the payment is due by. This is used show a payment on the calendar and it is also referenced in the reminder messages.
- Is Paid Off: This sets the creditor as paid off so that it no longer shows in drop down lists in the application where it shouldn't. It also prevents the creditor from being analysed for missed payments.
- Late Fee: This value is currently being used for the alert messages.
Creditor Hints
To prevent the application from alerting you of missed payments for creditors that have been paid off you can set the "Is Paid Off" flag. First it prevents you from being alerted that you have missed a payment for something you already paid off and second, it prevents that creditor from being included in drop down lists when they should be hidden. For instance when you are recording a payment you should not have to look through a list of items that also include things you already paid off. The other thing to notice when you update a creditor to be paid off is that the row in the grid for that creditor turns green.
Reminders

Reminder Attributes
- Creditor: The list of creditors that you can create reminders for.
- Start Date: When the reminders should start being sent.
- End Date: When the reminder should stop being sent.
- Frequency: How often should the reminders be sent.
- Week Day: What day of the week for weekly reminders should the reminder be sent on.
- Duration: How long should the application continue to send you the reminders.
Reports
The Dashboard shows a meter that represents your debt to income difference in a percentage scale from 0 to 100. Its kind of a cool quick glance at where you are for the month. Are you low on funds or are you higher on the scale.
The Current Month report shows a pie chart of all your payments to creditors in the current month.
The Debt report shows a pie chart of all your debt based on what you entered when you created or updated the creditor. This will change over time based on you paying down your debt.
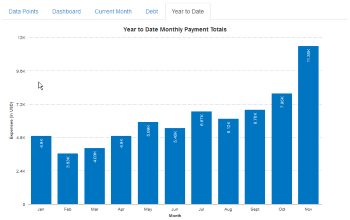
The Year to Date report is a bar chart that represents your monthly totals from the first of the year to where ever we currently are in the calender.
My Account
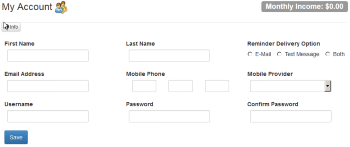
This is also where you configure how you want to receive alert notifications. If you want to receive email notifications then you would select that option under Reminder Delivery Option. If you would rather receive them via text message then select that options. If you would like to receive both then select that options. Just be sure that you have entered both your email address and phone number and have selected who your cell carrier is.
Once you have completed the entire form simply click the save button and you are all done. Any time you wish to make changes to the information just visit this page, make the changes and then click Save again.